Corsair is making custom liquid cooling loops accessible for everyone
As the PC market continues its growth, a number of companies are working to make entry easier for new PC builders. One such company is Corsair, who wants to give even the most novice of PC gamers a chance to build the custom machine of their dreams. That dream is becoming a reality with Corsair’s custom liquid cooling kit.
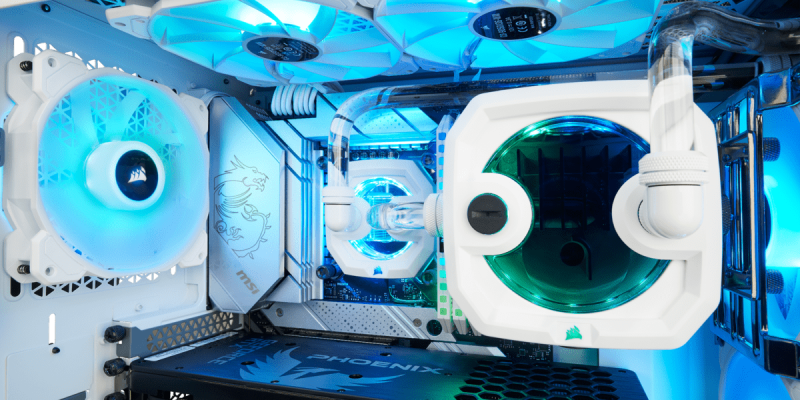
While Corsair has long offered liquid cooling solutions for PC owners, it’s always been in an à la carte style. But Corsair is now making custom liquid cooling more accessible by providing full starter kits to help builders easily create unique loops. Retailing for $479.99 USD in either white or black, the Hydro X Series iCUE XH303i RGB Pro Custom Cooling Kit takes the guesswork out of getting started with a liquid CPU cooling setup for AMD AM4 and Intel LGA 1200/115X sockets.
The Hydro X Series iCUE XH303i RGB Pro Custom Cooling Kit comes with everything you need to get started with your first custom cooling loop.
Included in the kit are the following:
XC7 RGB Pro CPU cooling block
XR5 360mm radiator
XD3 Pump/Reservoir
Three SP120 RGB Elite fans
Corsair iCUE Commander Pro
RGB LED fan hub
Six XT Hardline tubes with 16 total fittings
XT Hardline Bending Kit
XL8 Clear coolant
250 ml filling bottle
While this list might seem like it covers everything you need, there are some things you’ll need to have on hand to properly build your loop. The obvious is a screwdriver kit for installing the fans, pump, and other parts. One not-so-obvious tool that you may not realize you’ll need is a heat gun for bending the tubing. Luckily, if you don’t have one, they run just about $25 USD at most hardware stores.
Getting your build on

When you first open the box, there’s a good chance you’ll find yourself a bit overwhelmed with everything included. Because this is a complete kit rather than a simple all-in-one solution, everything is packaged separately. That means you’ll have a box for each fan, the radiator, the pump, etc.
Once you get everything opened from the kit, it’s time to cry at how much there actually is to put together. Ok, it’s really not that much, but again, for a beginner it might feel that way. Speaking of beginners, prepare for trial and error when you start to build, especially when getting to the latter steps of bending the tubes.
The first thing you’ll want to do is draw and layout how you want the parts to sit. Obviously, the CPU block position is set, but deciding on where to place the reservoir and radiator will make all the difference in the complexity of your bends later on. A word of advice, the newer you are, the simpler you should aim for your layout to be. The last thing you want is to have a layout where you are making complex bends that you aren’t ready for. Trust me when I say: the simpler, the better.
Pro Tip: Drawing out your layout on paper goes a long way towards making installation easier.
It’s a series of tubes

Once you have your layout planned, the next step is to plan your tubing layout. As someone who’s done multiple softline cooling setups, moving to hardline is no joke. I don’t want to sugarcoat things. This is where it can get tedious, frustrating, and, quite frankly, turn some people off. You only get six tubes in the kit, and replacing them can get pricey if you need more. But don’t let this scare you away, because the results are worth it. Take your time, measure, bend, and cut.
When starting, don’t be afraid to make a mistake. If this is your first time using hardline tubing, there’s a good chance you will screw up at some point. That shouldn’t discourage you. Instead, use the mistakes as a learning point to get better as you move forward. Again, don’t rush. Measure your distances and then measure two or even three more times. After you get your measurements down, it’s time to bend. For this step, you’ll need the heat gun and patience.
With the XT Hardline Bending Kit you get a 30cm silicone rod, which you put into the tubes while heating in order to avoid collapsing the acrylic-based tube when bending. To heat the hardline tubes, move the bend area back and forth while rotating. Avoid holding the tubing too close to the heat gun, as you can potentially burn yourself and cause damage to the tubing. Once it gets to the proper temperature, slowly bend it into position. The XT Hardline Bending Kit comes with a bending tool, but I found it easier to get the bends I wanted by free-handing it. That’s purely based on preference, though.
After you make your various bends and let them cool and solidify into position, it’s time to cut. The bending kit also comes with a clamp and saw to make the cuts you need to make your parts fit. At the expense of feeling like a broken record, I’ll reiterate that you need to take your time with the cuts. It’s also important to note that it’s always better to cut a bit too long rather than too short. Otherwise, your tubing won’t reach the coupling sockets at both ends of your tubing run. You’ll then have to start over with another piece of tubing and do your bends all over again.
To install the tubes, you’ll separate the fittings and put one half on the tube and screw the other side into the CPU cooling block/reservoir housing. Simply push the tube in, and then screw the fittings back together. Once your bends are done and you’re satisfied with your cuts and fits, rinse them in distilled water to clear out any debris or unwanted materials left over.
Pro Tip: Always do your cutting after you make your bends.

After you have your tubes shaped and installed, you’re ready to fill up the reservoir. For many, this is the scariest step because you’re pouring liquid into an area where there are expensive components. Just pour slow and you’ll be fine, though it doesn’t hurt to cover sensitive components below the reservoir with a sheet of plastic to allow for safe runoff.
Make one final check to ensure your plugs are in and your seals are as secure as possible. Then, simply take the filling bottle and use it to start filling your reservoir. At this point, you’ll want to make sure that the only thing plugged into the power supply (PSU) is the pump via the Molex connection. Disconnect every other component, like your motherboard and GPU. You should also install the jumper to the 24-pin motherboard connection of your PSU.
Turn on your PSU and wait for the first bit of water from the reservoir to be almost gone, then immediately turn it off. Check for any leaks before filling up the reservoir again. Should you have no issues, fill the reservoir again and run the system for about 24 hours to clear out any air pockets and then lock the seals.
Finally, cry tears of joy. You’ve completed your first custom cooling loop with hardline tubing. And now you even have the option to add more later on if you want to cool your GPU or even your M.2 NVMe SSD.
Corsair’s decision to simply take liquid cooling components it already sells and package them up as a “Getting Started” kit is one that makes you wonder why it hasn’t been done before. It opens up more accessibility for users that don’t know where to begin. As things move forward, it’s definitely an area where Corsair could put together even larger kits for even more in-depth cooling solutions.